To Repair the Startup Volume Run First Aid From Recovery Click Done to Continue Sierra
 Disk First Aid, currently part of Disk Utility, has long been the go-to utility for verifying and repairing a Mac's storage system. Included as a standalone app with the original Mac OS, it was later folded into Disk Utility when OS X was released.
Disk Utility, and its First Aid system remains the first line of defense for drives that are experiencing a number of issues, including:
- System crashes
- Files disappearing
- File sizes changing on their own
- Inability to copy files
- Inability to open or save files
- Startup issues
- Drives unmounting or ejecting on their own
- And a host of other errors and issues
In this guide, we're going to take a look at using Disk Utility's First Aid tool in macOS High Sierra to repair APFS and HFS+ file systems. First Aid can actually be used on any file system that macOS supports, but APFS and HFS+ are the most popular, and the ones you're most likely to encounter.
Related article: How to Revert a drive from APFS back to HFS+
We'll start by going through the actual process of using First Aid, and then take a more in-depth look at the process; we'll also provide a few troubleshooting tips.
Before you use First Aid, make sure you have a current backup of the drive or volume you're having issues with. If you're using First Aid as part of a routine maintenance program, you should still have a working backup of any volume that you'll be checking.
The Disk Utility app underwent a few updates with the release of macOS High Sierra to support the APFS file system. If you're working with OS X El Capitan through macOS Sierra, you may find the instructions in How to Use macOS Sierra Disk Utility to Verify or Repair Disks a better fit.
Disk Utility's Sidebar in macOS High Sierra and Later
Launch Disk Utility, located at /Applications/Utilities.
Disk Utility's default settings use a sidebar that only displays storage volumes. Since you may need to use the First Aid tool on volumes as well as partitions, catalogs, and physical devices, it's a good idea to change the sidebar settings to display all devices.
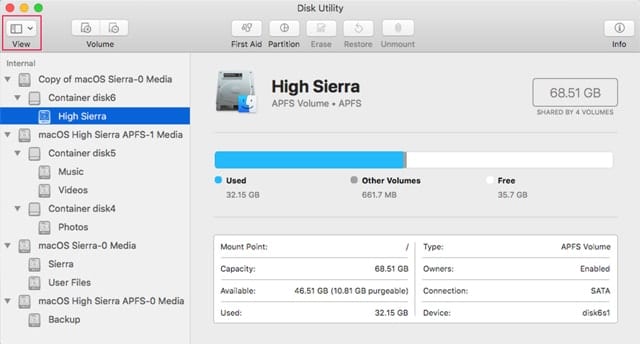
Click the View button in the Disk Utility toolbar and select Show All Devices from the popup menu, or select Show All Devices from the View menu.
The sidebar will now display all devices, including the physical drive and any APFS containers it may have, as well as any APFS or HFS volumes associated with the physical drive.
The organization of the devices is hierarchical, with the physical drive listed first, using the manufacturer's name, or the model name or number, or both. At the next level under the physical drive is the Container (APFS file system), followed by the volumes. If this is an HFS-formatted drive, there won't be any containers under the drive level, just volumes.
Each item can be selected and repaired using the First Aid tool.
First Aid Repair Order
You can actually repair the devices in any order, but I've been using the following order successfully for a while: Volume, Container (if applicable), Physical drive. My reasoning for this order is to limit potential data loss when repairing. As you move from the lowest level, the Volume, you add additional items that can be affected by a repair failure. Repairing a volume will normally only affect the selected volume. Repairing a Container can affect all volumes within the container. And repairing a Physical drive can affect all partitions, containers, and volumes housed on the drive.
While a problem that is causing an issue with a volume can be caused by a problem at any of the levels, starting at the volume level ensures the least risk.
Repairing a Volume, Container, or Drive
In Disk Utility's sidebar, select the volume, container, or physical drive you wish to use the First Aid tool on.
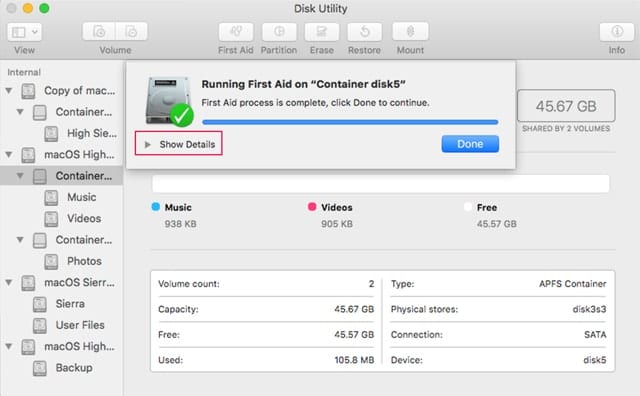
Click the First Aid button in the Disk Utility toolbar, or select Run First Aid from the File menu.
A sheet will drop down, asking if you wish to run First Aid on the selected device. Click the Run button to start the First Aid process.
The sheet will change to show the status of the repair process. When it's complete, click the Done button. You can also click on the chevron next to the "Show Details" text to display a log of the repair process. If you see any errors listed, jump to the troubleshooting section below.
Repeat this process for any additional volumes, containers, or drives that need to be repaired.
Repairing a Startup Volume, Container, or Drive
Disk Utility's First Aid can check a Mac's startup drive using a "Live Verification" process, however, if any repairs are needed, you will need to boot from the HD Recovery volume, or a bootable backup (clone) you may have created.
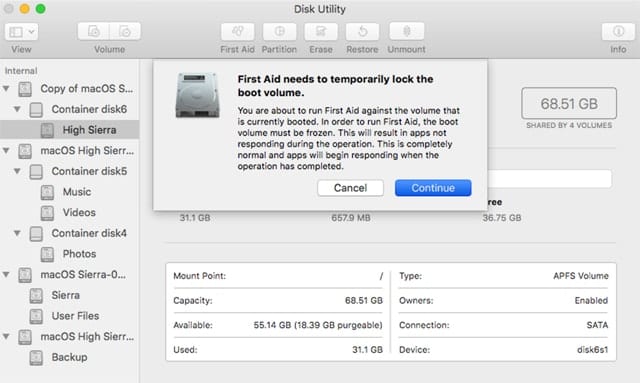
The Live Verification process works by freezing the file system during the verification process to ensure no changes are made while First Aid is running. This will usually cause your Mac to appear to be frozen, run slower, or produce an excessive number of beach balls. This is normal when verifying a startup drive. Once the verification is complete, your Mac will return to normal operations.
To verify a startup drive, select the startup volume from the Disk Utility sidebar, and then follow the same steps outlined above, in the Repairing a Volume, Container, or Drive section.
If First Aid indicates that a repair needs to be performed you can follow the instructions in the Repairing a Disk section of the Rocket Yard Guide: How to Use macOS Sierra Disk Utility to Verify or Repair Disks.
What Gets Checked or Repaired?
Physical drives have the same items checked and repaired no matter which file system is in use, HFS+ or APFS. The list includes:
- The partition list
- Partition map size
- EFI system partition
- EFI system partition's size
- EFI system partition's file system
- EFI system partition's folder content
- HFS data partition loader spaces
- booter partitions
- Core Storage Physical Volume partitions
APFS containers have the following items checked or repaired:
- The container superblock
- EFI jumpstart record (if a startup device)
- Space manager
- Object map
In addition, the following items for each volume within a container are also checked:
- APFS volume superblocks
- object map
- fsroot tree
- snapshot metadata tree
- extent ref tree
- snapshots
- allocated space
When checking an APFS volume, the same checks are performed as when checking an APFS container, with the exception that instead of checking all of the volumes within a container, only the selected volume is checked.
Troubleshooting First Aid Issues
There are a few common issues you may encounter when attempting to use First Aid on a volume, container, partition, or drive. Thankfully, most of these basic problems can be overcome, allowing you to complete the First Aid process and get your storage device back online and working.
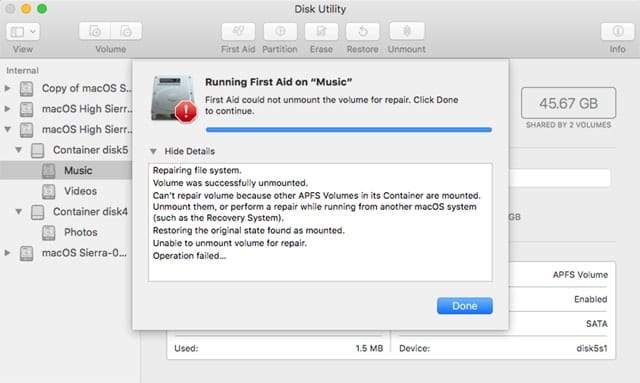
One of the more common problems that can keep First Aid from completing is a failure to unmount the selected device. Historically, this error most often occurred when trying to verify and repair the startup drive. The use of Live Verification, which freezes the file system while verification takes place, should prevent this common error, at least when there are no issues with the startup drive that need to be repaired. But you may see the problem with other drives. This can happen because a process on your Mac is accessing, making changes to, or has locked open files, preventing them from being closed and allowing the unmount process to occur.
The normal method of addressing the issue is to restart your Mac and boot from another device, perhaps the Recovery HD. But before you go to the trouble, give this a try:
Save any work in progress and close all open apps, including Disk Utility.
Launch Disk Utility, and try to run First Aid on the device that needs to be repaired or checked. There's a good chance that the device will be able to be unmounted this time around.
If you still have the unmount error, try manually unmounting the device. You can do this from within Disk Utility by selecting in the sidebar the device that is failing to unmount, and selecting Unmount from the File menu, or clicking the Unmount button in the toolbar.
If you still have an unmount error, try unmounting all volumes housed within the container (APFS) or partition (HFS+).
If you still can't check or repair the device because it won't unmount, you'll need to boot your Mac from an alternate device, perhaps a USB flash drive, the Recovery HD volume, or Apple's Internet Recovery Service.
By the way, booting from a USB flash drive with a full macOS system, a macOS installer, or a Recovery partition install on it is a great way to correct many of the common problems you may encounter trying to verify or repair a device.
An incorrect file size warning is also a common First Aid error you may encounter when First Aid checks catalog files. In some cases, the warning can be ignored, specifically if the file with the size problem is named "temp" followed by a number, such as temp347294. These files are showing the wrong size because they were open at the time you started First Aid, and the Live Verification process doesn't update any open files. The other reason not to care about errors on these types of files is that they are temporary files that are automatically removed the next time you start your Mac up.
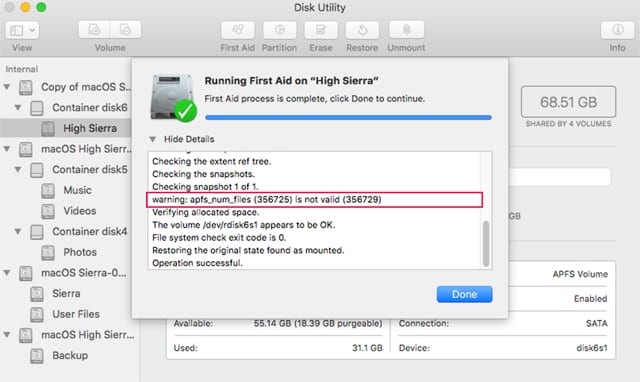
If the incorrect file size occurs for other files you should rerun First Aid to see if they have been fixed. If they still show as an error, try starting your Mac in single-user mode, and running fsck. You can find instructions in the Rocket Yard Guide Safe Mode & Single-User Mode: What They Are, How to Use Them.
Disk Utility's First Aid can fix many basic drive problems, but it has the best chance of fixing an issue when it first occurs; that's why it's a good idea to run First Aid as part of a routine maintenance practice. Fixing issues when they're small and manageable is easier than recovering from data storage issues that may include data loss.
If Disk Utility can't fix the problems your drive is experiencing, consider one of the heavy-duty apps designed to solve a large number of disk problems, including recovering lost data, available from MacSales.com.
Source: https://eshop.macsales.com/blog/44661-first-aid-verify-and-repair-hfs-apfs-drives-with-disk-utility/
0 Response to "To Repair the Startup Volume Run First Aid From Recovery Click Done to Continue Sierra"
Post a Comment